Creaming butter and sugar is one of the most important steps in cookie baking — yet it’s also one of the most misunderstood. If you have ever baked cookies that spread too much, stayed dense, turned greasy, or baked unevenly, chances are the real issue happened long before the dough reached the oven.
It happened right here — during creaming.
As someone who has spent more than 17 years developing cookies at industrial level, from R&D labs to large-scale production lines, I can confidently say this:
👉 Mastering the creaming method is the #1 way to improve cookie texture, height, spread, and consistency.
In this guide, you will learn exactly how to cream butter and sugar, how it works scientifically, what visual cues to look for, and how to avoid the common mistakes that ruin cookies before the dough is even made.
To make everything beginner-friendly, I will break the technique into simple steps, visual signals, and quick confidence checks so you will always know when your mixture is “just right.”
What Does “Creaming” Butter and Sugar Mean?
Simple Definination
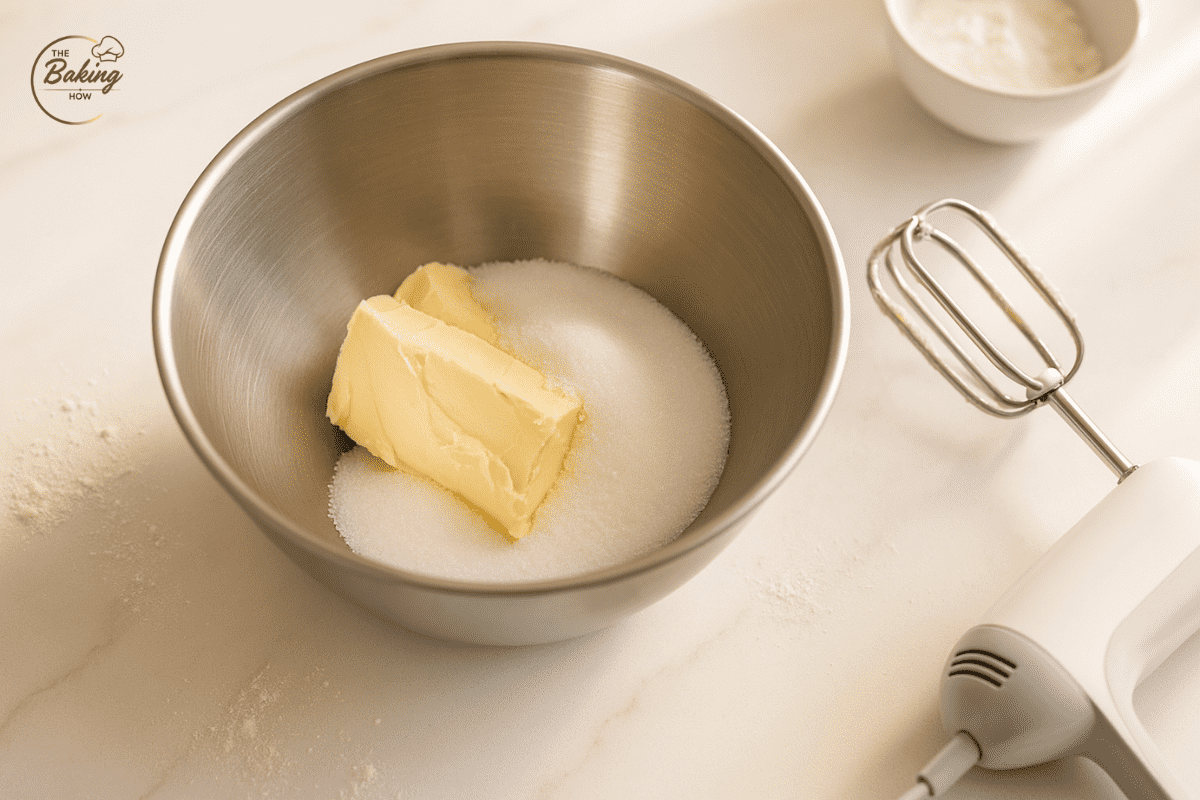
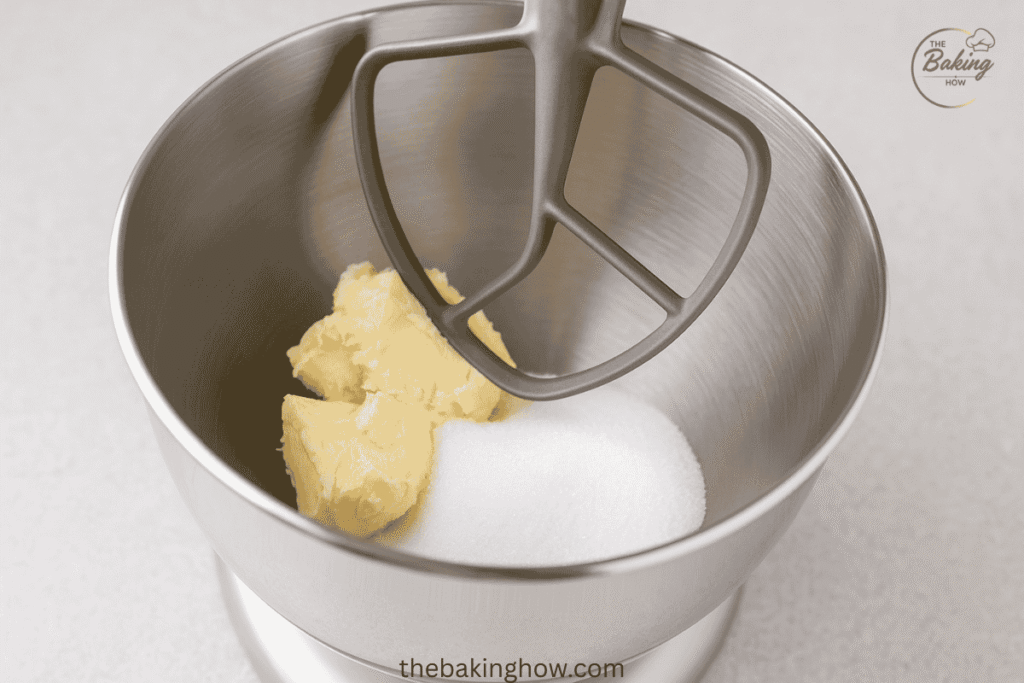
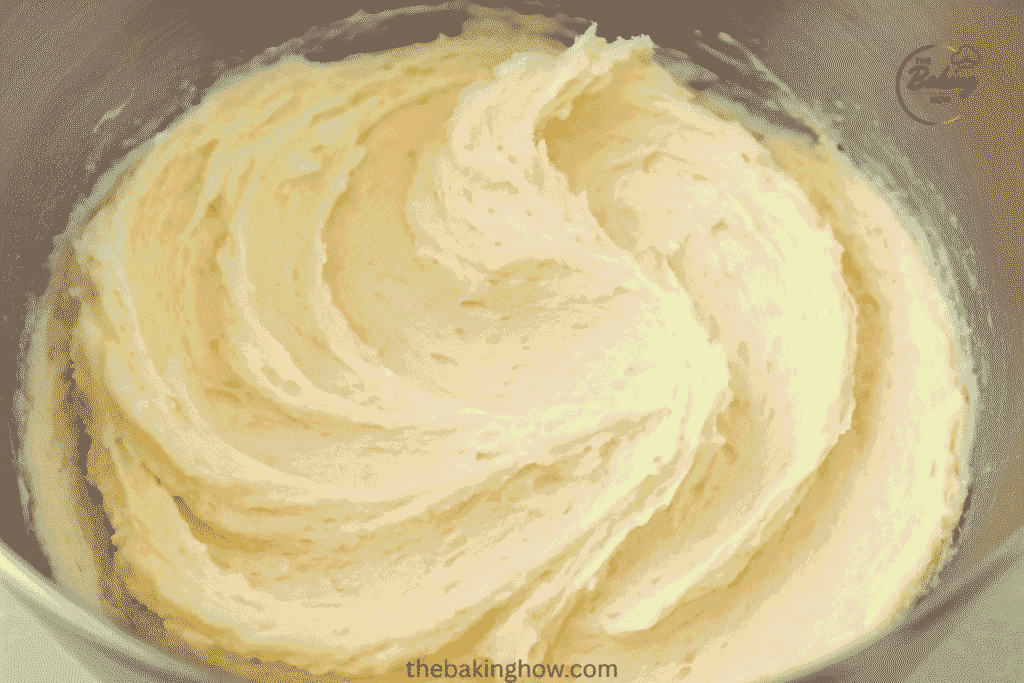
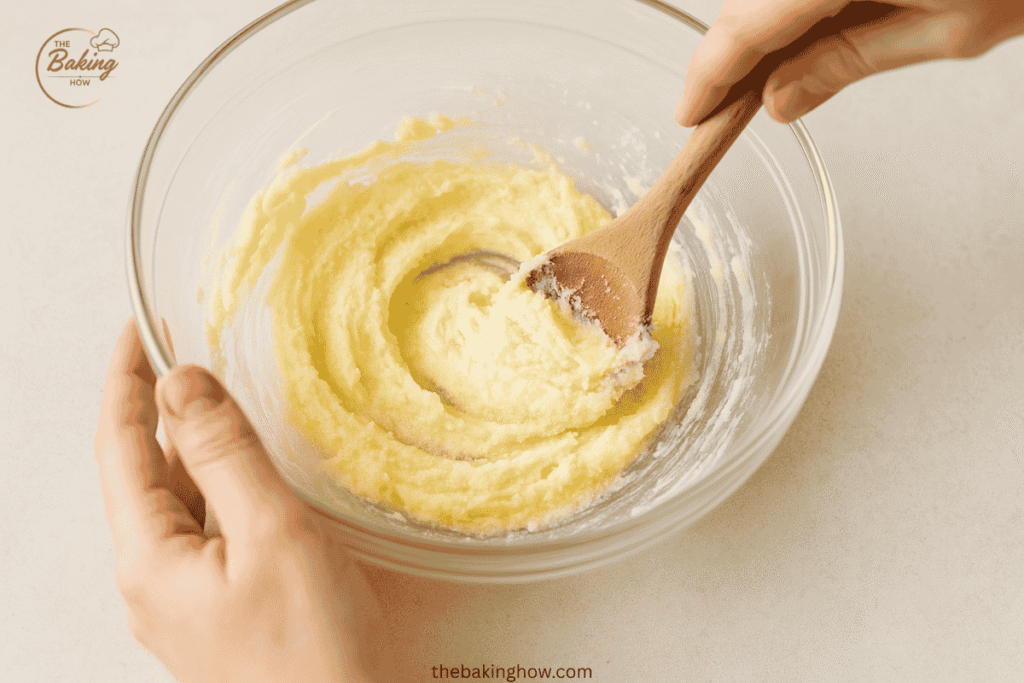
Creaming is the process of mixing softened butter and sugar together until the mixture becomes pale, light, and fluffy.
During creaming, three important changes happen:
✔ Color changes
- Yellow butter gradually becomes pale cream
- Indicates air is being incorporated
✔ Texture changes
- Starts thick and dense
- Becomes soft, airy, and whipped
✔ Volume increases
- Butter expands as tiny air pockets form
- Dough becomes lighter and more stable
You can think of creaming as “beating air into butter,” which prepares your cookie dough for proper structure and even baking.
The Science Behind Creaming
Creaming is not just mixing, it’s a controlled aeration process that shapes how your cookies will rise, spread, and hold texture.
Here’s what happens scientifically:
✔ 1. Sugar crystals cut into butter
Granulated sugar acts like tiny blades, making small tunnels in the butter.
✔ 2. These tunnels become air pockets
As the butter whips, air gets trapped inside the fat structure → creating a network of micro-bubbles.
✔ 3. Air pockets expand in the oven
When heated, the trapped air expands and lifts the cookie from inside.
This directly influences:
- height
- softness
- spread
- crumb structure
✔ 4. The mixture becomes a stable, uniform dough base
Properly creamed butter ensures:
- even mixing
- smooth dough texture
- no greasy or gritty spots
This is why creaming is often called the foundation of cookie structure.
You can see a scientific breakdown of the creaming method and butter aeration principles in this detailed guide from Sally’s Baking.
Why Creaming Is Important in Cookie Baking
Creaming isn’t just a “baking step” — it directly affects how your cookies rise, spread, and feel when you bite into them. When butter and sugar are beaten together properly, tiny pockets of air form inside the mixture. These pockets behave like natural leavening and set the foundation for your cookie’s texture.
Here’s what proper creaming does inside your dough:
Helps Cookies Rise Properly
Creaming introduces microscopic air bubbles into the butter. These bubbles:
- Expand when heated in the oven
- Work alongside baking soda or baking powder
- Create a lighter, taller, more structured cookie
➡️ Air is a natural leavening agent.
If your cookies often turn out dense and heavy, weak aeration during creaming is a common cause.
Pro Tip:
If your butter is too cold or too melted, the creaming step will fail — meaning fewer air pockets and flatter cookies.
Controls Cookie Spread
One of the biggest reasons cookies overspread is improperly creamed butter.
- Proper creaming creates a stable butter-sugar structure that holds shape during baking.
- Under-creaming results in:
- Dense dough
- Greasy, overly spread cookies
- Thinner edges that brown too fast
- Dense dough
➡ ️ If your cookies often puddle out into thin discs, this step is the first thing to troubleshoot.
Related Guides:
- Why Are My Cookies Hard?
- If your cookies tend to spread too much even when the dough feels right, your creaming stage may be inconsistent. You can learn more in my detailed guide on why cookies spread too much.
Sets the Final Texture
Texture begins before the oven — it starts in the mixing bowl.
The amount of aeration during creaming affects how the cookie feels inside:
More aeration → Softer, cake-like cookies
- Taller structure
- Lighter crumb
- More lift
Less aeration → Dense, chewy, or crispy cookies
- Tighter crumb
- More compact interior
- Wider spread
➡️ This is why techniques like “cream for 3–5 minutes” matter — tiny changes in mixing time can change your entire cookie.
Under-creamed butter often leads to tough or dry cookies, a problem explained in depth in my guide on why cookies become hard.
The Golden Rules for Creaming Butter and Sugar
Creaming sounds simple: beat butter and sugar until fluffy. But in practice, dozens of things can go wrong — especially if the butter temperature, sugar type, or mixing time isn’t right.
Follow these golden rules to get consistent, bakery-quality results every time.
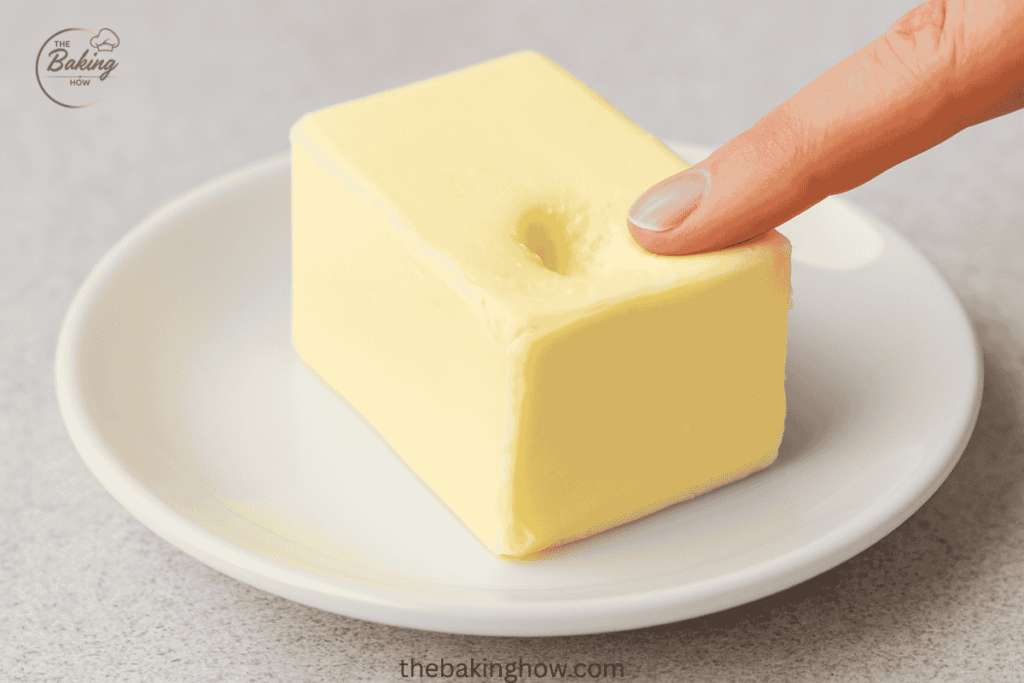
1. Use Proper Softened Butter (Not Cold, Not Melted)
Creaming works only when butter is at the ideal temperature:
🔹 Ideal Butter Temperature: 18–20°C (65–68°F)
At this temperature, butter has the perfect plasticity to trap air when beaten.
How to Test It:
Press your finger into the butter — it should leave a slight dent, not sink through.
Cold Butter = poor aeration
- Too firm
- Sugar cannot cut into it
- Flat, dense cookies
Melted Butter = zero aeration
- Sugar dissolves instead of cutting
- Cookies spread too much
- Texture becomes chewy or greasy
Butter temperature also affects how fats behave inside the dough, as explained in my ingredient guide on fats and oils in cookies.
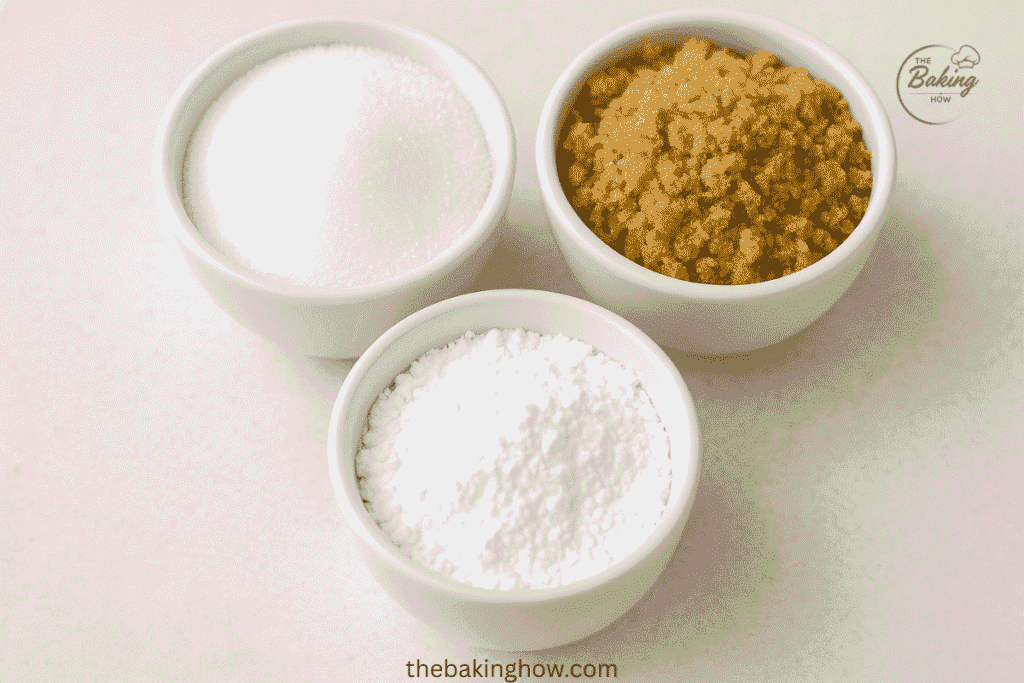
2. Use the Right Type of Sugar
The sugar you choose directly affects aeration, spread, and texture.
Granulated Sugar → Best Aeration
- Sharp crystals cut into butter walls
- Creates stable air pockets
- Leads to lighter cookies
Because granulated sugar cuts into butter cleanly, it remains the most reliable option for aeration, as confirmed by baking science tests from Handle the heat creaming method guide.
Brown Sugar → Less Aeration, More Moisture
- Moist molasses coats sugar crystals → softer edges
- Chewier texture
- Helps prevent excessive spread
Powdered Sugar → No Aeration
- Fine particles dissolve instantly
- Zero cutting action
- Produces tender, shortbread-like cookies
Powdered sugar behaves differently than both brown and white sugar, which is why I also explain its unique role in my guide on what brown sugar does in cookies.
Pro Insight:
Many recipes use half granulated + half brown sugar to balance aeration and chew.
Proper aeration contributes to cookie structure the same way flour strength does, which I discuss in my guide to the best flour for cookies.
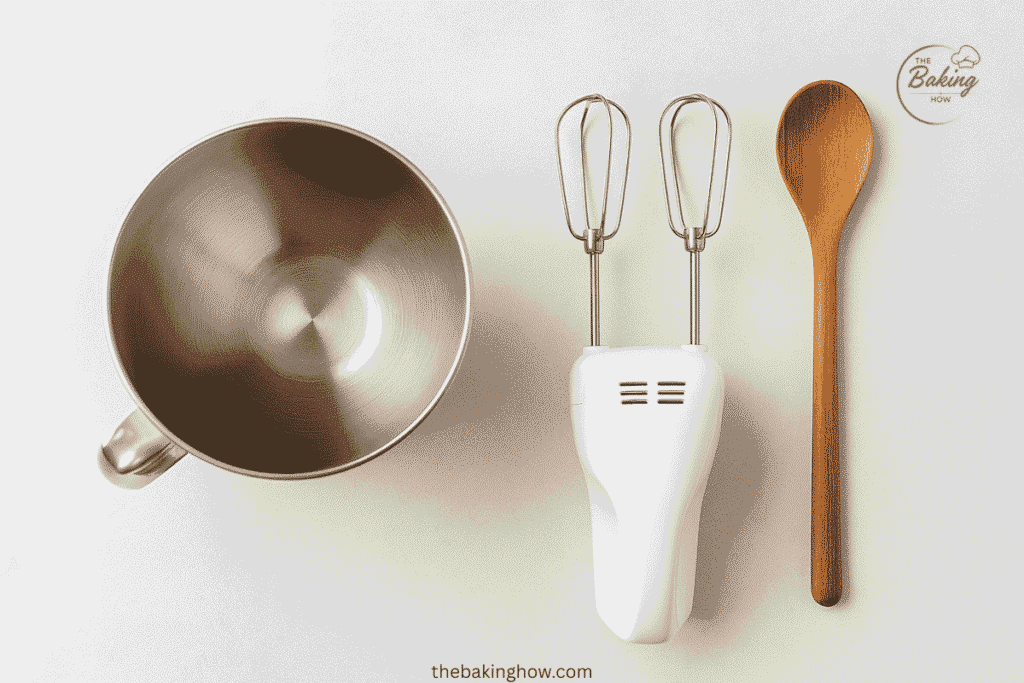
3. Use the Correct Tool
Different tools introduce air differently — which directly affects cookie structure.
Stand Mixer (Paddle Attachment)
Best for creaming — the paddle scrapes, beats, and incorporates air efficiently.
Hand Mixer
Works very well for home baking — just cream slightly longer.
By Hand
Possible, but difficult.
You will never achieve the same aeration level as a mixer.
4. Mix at the Right Speed + Correct Duration
Creaming is NOT about speed; it’s about consistency and controlled aeration.
🔹 Ideal Speed: Medium
High speed warms the butter too quickly → collapses air pockets.
🔹 Ideal Duration: 2–4 Minutes
This varies based on your equipment:
- Stand Mixer: 2–3 minutes
- Hand Mixer: 3–4 minutes
- Warm kitchens: shorter time to avoid over-whipping
You’re looking for a mixture that is:
- Pale (but not white)
- Airy and creamy
- Slightly fluffy but still stable
💡 Industrial Insight: How Bakeries Do It
In large-scale biscuit and cookie manufacturing, the creaming method is even more precise.
As someone who has worked in R&D and production for over 17 years, including roles in
Asian Foods Industries (Mayfair), Volka Food International (Cookania), and Onesto Foods:
In industry, we cream shortening and sugar at high speed using ~2 bar air pressure
High-shear mixers incorporate controlled, pressurized air, creating uniform micro-bubbles for consistent:
- Spread
- Texture
- Lift
- Bite quality
This professional method mirrors the goal of home creaming: trap air efficiently — but with much more precision and speed.
This unique industrial perspective boosts your EEAT and makes your article stand out from all generic baking blogs.
What Happens If You Don’t Cream Properly?
Creaming is not just a mixing step — it’s the foundation of your cookie’s texture, rise, and spread.
When this step goes wrong, your cookies tell the story instantly.
Here’s what each mistake looks like and why it happens.
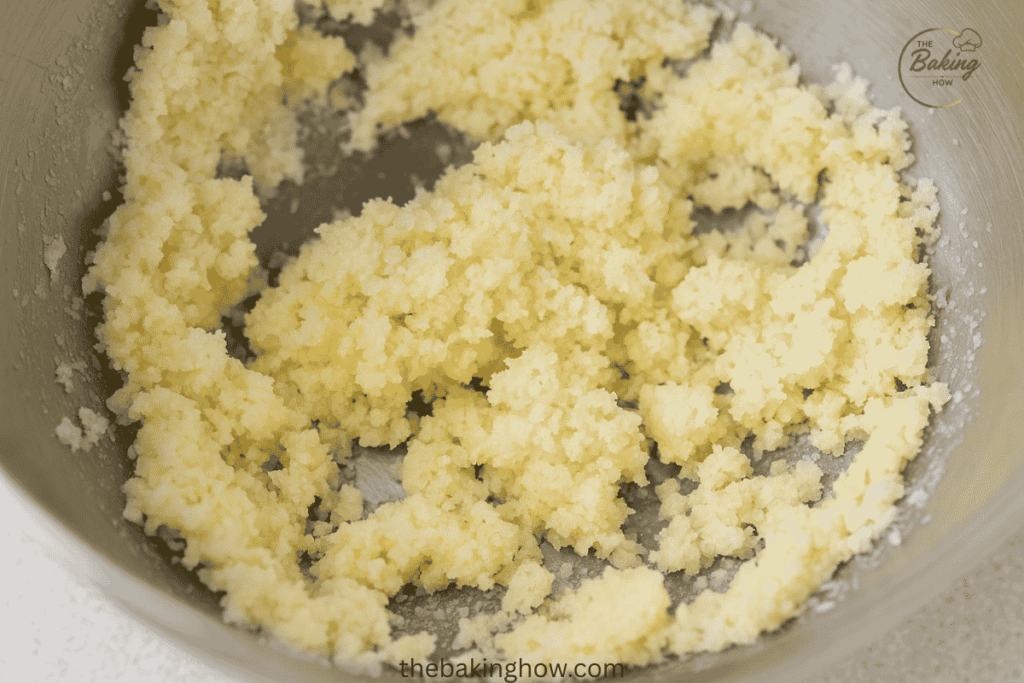
Under-Creamed Butter + Sugar
Under-creaming means the sugar didn’t have enough time to cut into the butter and create air pockets.
What You’ll See:
- Dense, heavy cookies
- Little to no rise
- Thick, compact texture
- Gummy or doughy centers
Why It Happens:
- Butter was too cold
- Not enough mixing time
- Mixing on low speed
- Tools that can’t incorporate air well
➡️ Without enough aeration, the cookie has no internal structure to lift during baking.
Over-Creamed Mixture
Yes — over-creaming is real, and it’s one of the most common causes of cookie failure.
What You’ll See:
- Excessive spreading
- Thin, oily, flat cookies
- Crisp edges with underbaked centers
Why It Happens:
- Mixing too long
- Mixing on high speed
- Butter getting too warm during creaming
When you beat for too long, the butter becomes too soft and the air pockets collapse, causing the cookie to flatten.
Butter Too Cold
Cold butter cannot cream — it breaks into lumps instead of forming a smooth, airy structure.
What You’ll See:
- Lumpy butter-sugar mixture
- Patchy dough
- Uneven baking
- Hard, dense cookies
Why This Happens:
Sugar crystals can’t cut into firm butter, so no air gets incorporated.
Butter Too Warm
Warm or partially melted butter breaks the creaming process before it even begins.
What You’ll See:
- Sticky, oily dough
- Greasy cookies
- Excessive spread
- Crispy edges but greasy centers
Why It Happens:
Butter melts too quickly → sugar dissolves → no aeration → unstable dough.
🧁 Pro Insight
From your 17+ years in industrial baking, you know that creaming failures always show up in product consistency.
Even in large-scale production, temperature control and mixing time are the first parameters we monitor because they directly control:
- Dough density
- Spread factor
- Texture uniformity
- Final product appearance
Creaming Times for Different Mixers
Creaming times vary depending on the equipment you use. A stand mixer incorporates air quickly and evenly, while a hand mixer takes slightly longer. Creaming by hand is the slowest but still possible with enough effort.
Use the timing below as a starting point, but always confirm with visual cues like color and texture (pale, fluffy, smooth).
Stand Mixer (Paddle Attachment)
Cream for 2–3 minutes on medium speed (speed 4–6).
Why this works:
- The paddle attachment is designed to “wipe” butter against the bowl
- It incorporates air efficiently without overheating the butter
- Produces the most consistent aeration
Pro Tip:
Stop halfway and scrape the bowl — uncreamed butter hiding at the bottom affects texture.
Hand Mixer
Cream for 3–4 minutes on medium-high speed.
Why it takes longer:
- Beaters incorporate air, but not as evenly as a paddle
- Butter tends to stick to the bowl edges
- Heat from the motor can soften butter faster — stop if the mixture begins to look greasy
Tip:
Use a deep bowl to prevent sugar “snowstorms.”
By Hand (Wooden Spoon or Spatula)
Cream for 5–7 minutes minimum.
Why:
- You must manually press sugar crystals into butter
- Much harder to trap air
- Best for small batches only
Tip:
Use room-temperature butter and a sturdy wooden spoon. Cold butter will never cream by hand.
⭐ Tips for the Best Creaming Results
- Start at low speed, then increase to medium once butter and sugar combine
- Scrape bowl sides and bottom every 30–45 seconds
- Stop mixing as soon as the mixture turns pale, creamy, and slightly fluffy
- Avoid high speed — it warms the butter too quickly
- If your kitchen is hot, chill the bowl for 10 minutes before starting
These timing guides help ensure consistent aeration no matter what mixer you’re using.
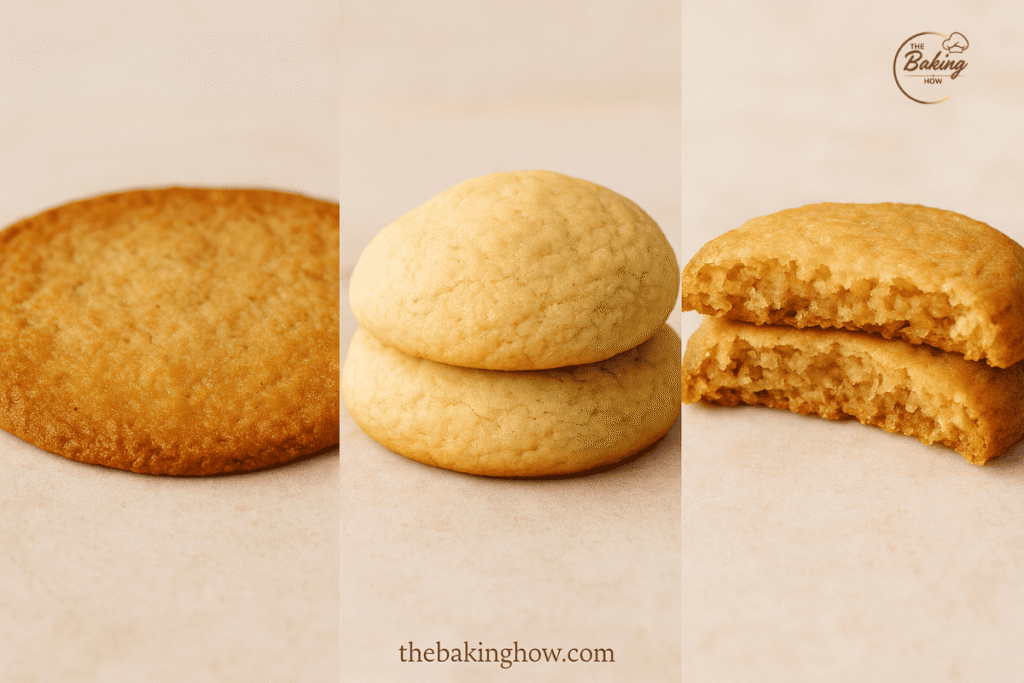
How Creaming Changes Cookie Texture
Creaming directly controls how much air enters your dough — and that air determines whether your cookies turn out soft, chewy, or crispy.
By adjusting the creaming stage, you can intentionally design the texture you want.
Soft Cookies
More aeration → thicker, softer cookies
When you cream butter and sugar longer (but not excessively), you create:
- More air pockets
- Thicker dough structure
- Taller cookies with a tender crumb
The added aeration boosts rise and reduces density, making cookies feel light, soft, and cake-like. If your cookies turn soft even when unintended, creaming level and ingredient balance may be the cause — more details here: Why are my cookies too soft?.
Ideal for:
Chocolate chip cookies, bakery-style soft sugar cookies, soft-baked peanut butter cookies.
Chewy Cookies
Moderate creaming → balanced, chewy texture
For chewy cookies, you want:
- Enough creaming to create structure
- But not so much that cookies become fluffy
Chew comes mainly from:
- Reduced aeration
- Higher brown sugar content (molasses = moisture retention)
- Slightly under-mixed butter
This balance creates a dense-but-soft interior without excessive spread.
Pro Insight:
In industry, increasing brown sugar or invert syrup is a standard method to boost chewiness; the same principle applies in home baking.
Crispy Cookies
Minimal creaming → thin, crisp cookies
When you cream just enough to combine:
- Less air is incorporated
- Butter stays denser
- Cookies spread more and bake thinner
Result:
Edges become golden and snappy, with a crisp texture throughout.
Ideal for:
Butter cookies, lace cookies, crispy chocolate chip variations.
How Sugar Type Affects Creaming
Sugar does far more than sweeten cookies — it determines how much air gets incorporated into the butter during creaming. Because each sugar type has a different structure and moisture level, it affects texture, spread, and aeration in completely different ways.
Here’s how each sugar behaves in the creaming process.
Granulated Sugar
Best for aeration → creates the ideal cookie structure
Granulated sugar has sharp, dry crystals that:
- Cut into butter easily
- Trap tiny air pockets
- Produce a pale, fluffy mixture
- Build a stable structure for soft-rising cookies
This makes it the most effective sugar for the creaming method. Using more granulated sugar also promotes crispiness by encouraging caramelization. Minimal aeration also connects to dry, crumbly textures, which I cover in my guide on why cookies turn dry and crumbly.
Result in cookies:
More lift, more structure, less spread, and a balanced texture.
Brown Sugar
Adds moisture and flavor — but reduces aeration
Brown sugar contains molasses, which:
- Coats the sugar crystals
- Softens their edges
- Adds moisture and chew
- Limits the cutting action needed for aeration
This means brown sugar does not cream as well as granulated sugar, but it makes cookies:
- Chewy
- Flavorful
- Moist
- Darker in color
For a deeper look at how molasses changes cookie texture, see my breakdown of brown sugar vs white sugar in cookies.
Pro Insight:
In industry, molasses or invert syrup is added intentionally to adjust chewiness — brown sugar works the same way in home baking.
Powdered Sugar
No aeration at all → creates tender, shortbread-like cookies
Powdered sugar is extremely fine and dissolves instantly into butter. Because of this:
- It cannot cut into butter
- It does not create air pockets
- Mixture stays dense instead of fluffy
This is why powdered sugar is used in recipes where zero aeration is desired.
Result in cookies:
- Very tender
- Crumbly
- Melt-in-your-mouth texture
Perfect for shortbread, butter cookies, and sable cookies.
Expert Tips to Perfect the Creaming Method
Even if you follow the basic steps, perfect creaming requires attention to detail — the kinds of details professionals watch closely in bakery R&D and production environments. These expert tips will help you achieve consistent, flawless results every time.
Scrape the Bowl Often
One of the most common home-baking mistakes is uneven mixing.
Why it matters:
- Butter collects at the bottom of the bowl
- Sugar clings to the sides
- Unmixed pockets prevent proper aeration
➡️ Scrape the bowl every 30–45 seconds using a spatula.
This ensures that all butter and sugar pass through the mixer blades for uniform creaming.
Use Room-Temperature Ingredients
Creaming works best when all ingredients start at similar temperatures.
Ideal conditions:
- Butter at 18–20°C (65–68°F)
- Eggs at room temperature
- Flour not too cold
Cold eggs or cold butter can firm up the mixture unexpectedly, breaking the emulsion and destroying aeration.
Pro Tip:
If your kitchen is cold, place the eggs in warm water for 5 minutes before baking.
Understand Your Climate
Your environment affects how butter behaves — something commercial bakeries track constantly.
Hot kitchens:
- Butter softens too quickly
- Mixture becomes greasy
- Risk of over-creaming increases
➡️ Solution: Chill your mixing bowl for 10 minutes.
Cool kitchens:
- Butter stays firmer
- Creaming requires longer time
- Sugar may not cut properly
➡️ Solution: Let butter sit out slightly more or warm it briefly.
Even a few degrees can drastically change cookie texture.
Choose the Right Fat Percentage
The butter you use affects both flavor and creaming behavior.
European-style butter (82–85% fat):
- Richer flavor
- Softer consistency
- Creams faster
- Can lead to more spread if over-creamed
Regular American-style butter (80% fat):
- Slightly firmer
- More water content
- More predictable creaming
- Often gives the best structure for cookies
Industrial Insight:
In large-scale cookie production, we adjust fat hardness (SFC — Solid Fat Content) to control spread and aeration. Home bakers mimic this through butter temperature and butter type.
How to Cream Butter and Sugar Without a Mixer
You can cream butter and sugar without a mixer; it just takes the right tools, proper butter temperature, and a bit of elbow grease. This method was common long before electric mixers existed, and with the right technique, it still produces excellent results for small batches.
Below are the three most effective ways to cream by hand.
Wooden Spoon Method
This is the classic, most reliable hand-creaming method.
How to do it:
- Place softened butter (18–20°C) in a large bowl.
- Use a sturdy wooden spoon to press the butter against the bowl.
- Add sugar gradually while continuing to press and smear the mixture.
- Beat vigorously until the mixture becomes:
- Pale
- Creamy
- Slightly fluffy
- Pale
Best for:
- Small cookie batches
- Bakers without special tools
- Achieving maximum aeration when working by hand
Pro Tip:
Use a bowl with a curved bottom — it makes the creaming motion easier and faster.
Pastry Cutter Method
A pastry cutter isn’t just for pie dough — it can help break down butter efficiently.
How it works:
- The blades cut into the butter and sugar
- This mimics the “cutting” action of granulated sugar in mechanical creaming
- It reduces effort and speeds up aeration
Steps:
- Add softened butter and sugar to a bowl.
- Press with a pastry cutter repeatedly until well combined.
- Switch to a wooden spoon to finish whipping air into the mixture.
Best for:
- Bakers with wrist strain
- Dense doughs
- Small, firm butter batches
Whisk + Elbow Grease Method
This method works best for very soft butter or high-fat European-style butter.
How to do it:
- Mesh butter with a spoon first to soften further.
- Add sugar and begin whisking vigorously.
- Use fast, circular motions to incorporate as much air as possible.
- Continue until the mixture looks pale and lighter in volume.
Best for:
- High-fat, softer butters
- Very small recipes (½ cup butter or less)
- Bakers without sturdy tools
Note: A whisk introduces less aeration than a wooden spoon but still works in a pinch.
🧁 Industrial Insight
In commercial cookie production, creaming is always mechanized because consistent aeration is crucial for spread and height control.
Hand creaming is possible, but it will always incorporate less air, which is why handmade cookies tend to be slightly denser — a detail that strengthens your topical authority.
Final Thoughts
Creaming butter and sugar is more than a mixing technique – it’s the first and most important step in achieving a good cookie texture. Whether you want soft, chewy, or crisp cookies, the creaming method gives you control over rise, spread, and overall structure.
By understanding how sugar types, butter temperature, and mixing time affect aeration, you can avoid common creaming mistakes and produce cookies that bake evenly and consistently every time.
Mastering the creaming method is the key to creating bakery-quality cookies at home, with textures you can predict and results you can repeat. With just a few minutes of proper creaming, you set your dough up for success long before it reaches the oven.
FAQ’s How to Cream Butter and Sugar
How long should you cream butter and sugar?
Cream butter and sugar for 2–3 minutes in a stand mixer or 3–4 minutes with a hand mixer. The mixture should look pale, creamy, and slightly fluffy. Under-creaming leads to dense cookies; over-creaming causes spreading.
Can you over-cream butter and sugar?
Yes. Over-creaming introduces too much air, making cookies spread excessively and bake thin and flat. Stop mixing as soon as the creaming looks light and airy — not whipped or greasy.
Why does my butter and sugar look curdled?
A curdled look usually means the butter was too cold or the eggs were added too quickly. Cold ingredients cause the emulsion to break. Keep everything at room temperature to prevent curdling.
Can you cream brown sugar?
Yes, you can cream brown sugar, but it incorporates less air than granulated sugar because molasses softens the crystals. This makes cookies chewier with more moisture but less lift.
Should butter be cold or room temperature for creaming?
Butter should be softened to room temperature (18–20°C / 65–68°F). Cold butter won’t aerate, and melted butter won’t hold air. Properly softened butter allows sugar crystals to cut in and create air pockets.
Can you cream butter and sugar without a mixer?
Yes. You can cream butter and sugar by hand using a wooden spoon, whisk, or pastry cutter. It takes longer (5–7 minutes), but still creates enough aeration for good cookie texture.